Introduction
Creating your first Plan
When you first open the Workteam Planner, you are presented with a series of pre-defined templates, which you can use as the basis of your first Workteam plan.
The templates are only shown until you create your first plan. Once at least one plan exists, these will show in place of the templates. The templates will remain available for selection in the New Plan dialog.
To base your new plan on an existing template, simply press the Choose button on the relevant template. To help you decide which template to use, you can click on the screenshot to see a larger preview of what your resulting plan might look like.
On pressing the Choose button, the New Plan dialog will appear, with the relevant template selected.
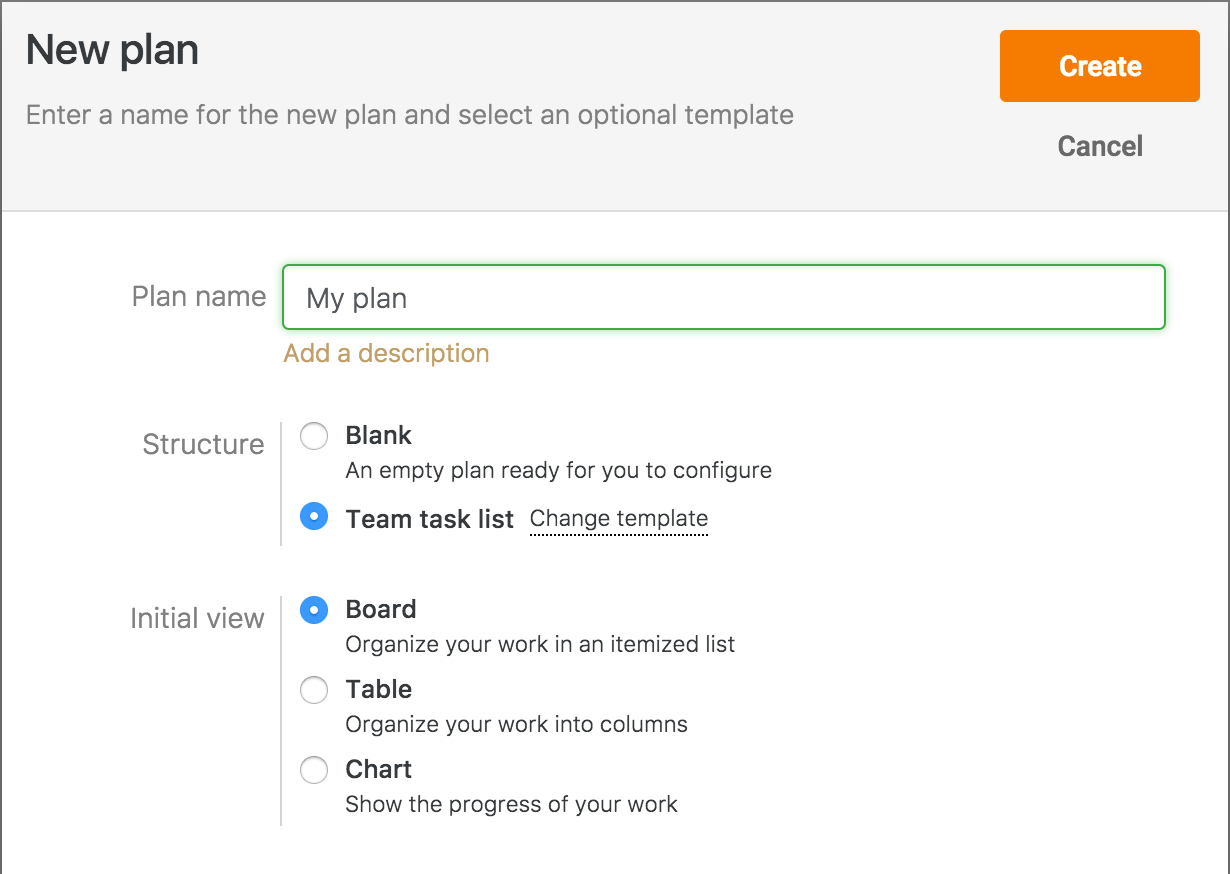
If you do not wish to base your plan on a pre-defined template, simply press the New Plan button in the top banner. In this case, the New Plan dialog will appear with no template selected.
Enter a name for the new plan and choose whether you want the default view to be a Table view or a Board view. The Table view is better for lists of items, where you want to be able to easily change all the fields of data associated with each item. The board view is more appropriate for when you want to show more items at a time and be able to easily drag the items from one category (or bucket) to another.
If you want to share your plan with others, it may be prudent to add a description. This will help other users understand the purpose of the plan. Clicking on the “Add a description” link with reveal a text box, letting you enter a description.
Press the Create button to create the plan.
Board View
When you create a blank plan, the default view shown is the Board view. This view is a columnar representation of your work.
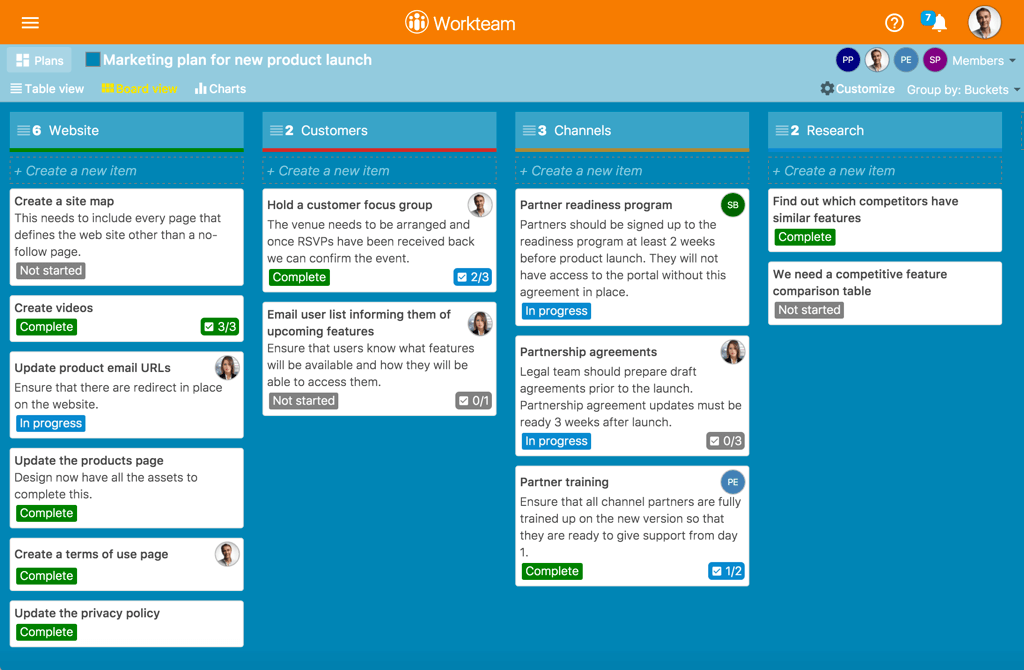
It lets you organize your work into vertical categories, or stages of work. It is the preferred view if you want to be able to move work items from one category to another by dragging and dropping items. It is also the better view if you wish to show images that have been attached to work items.
Table View
The Table view is more suited to lists of work items, where it is important to see and easily edit the fields of data associated with an item, in an aligned fashion, just like a spreadsheet. The table view provides an easier way to edit the value of item fields in-place, without showing the item dialog.
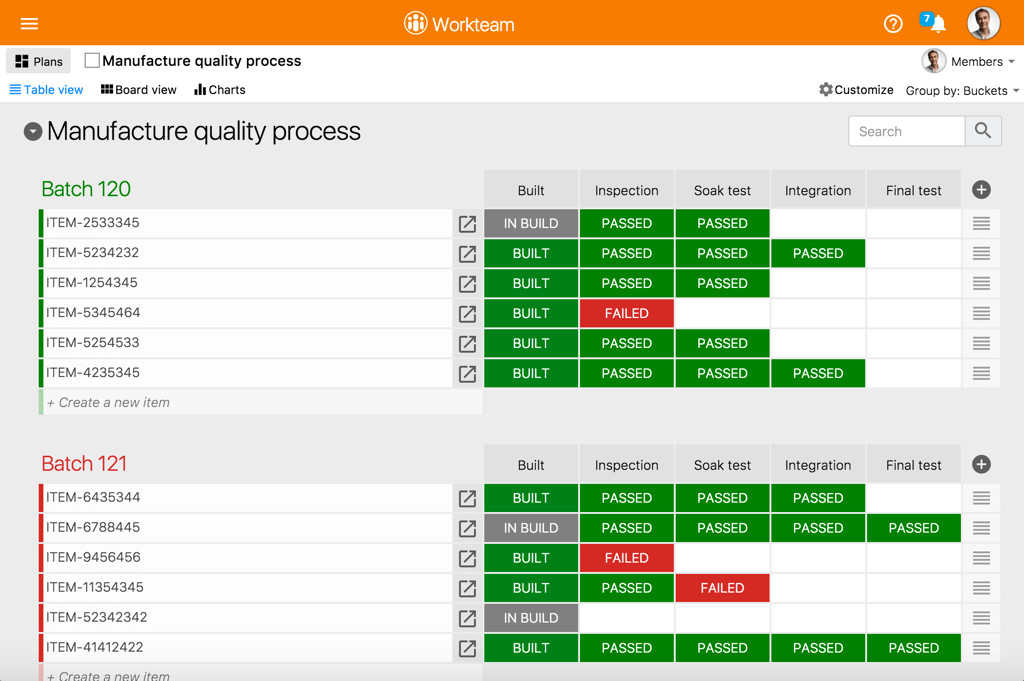
Chart View
The Chart View shows a representation of the progress of a plan over time. It works best if the plan contains a Status field, but can still work without one, provided there is at least one category field.
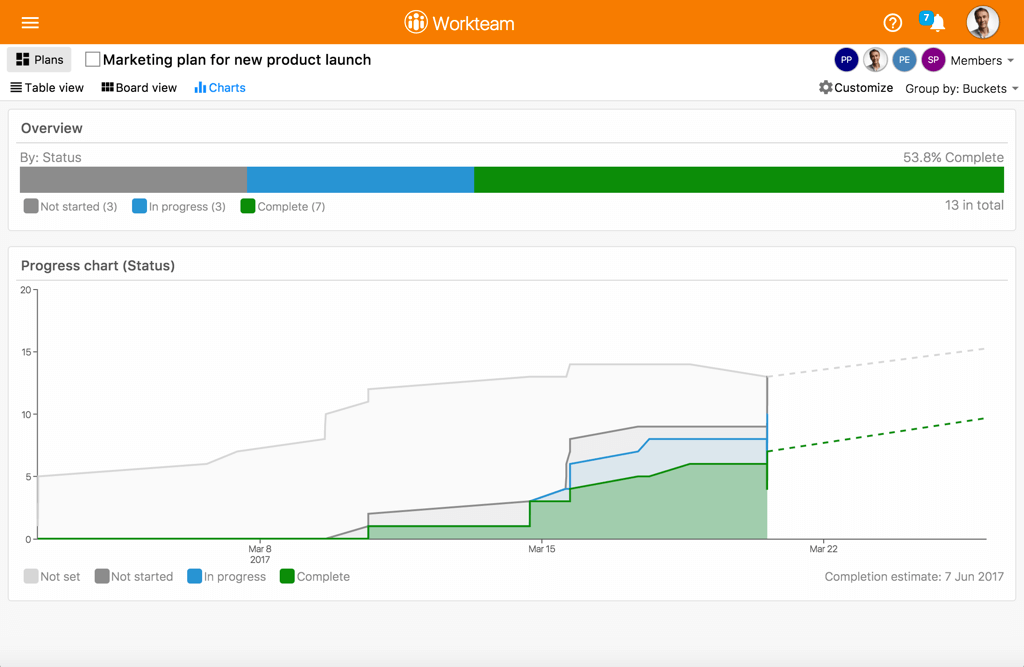
If the plan contains a Status field, the Chart view will show the progress of completion of items over time, including new items that have been added to the plan as well as items that have been started and items that have been completed. The Chart view also provides a prediction of when the plan will complete, based on the historical velocity of each member of the team. It also factors in each team member’s time off taken during the phase of the plan, when estimating the plan completion.
Buckets
Once you have created a new blank plan, the next step is to create some buckets. Buckets are containers for your plan items. They are a way of organizing work into stages or categories. For instance, if you were creating a plan to act as a simple to-do list, you might create buckets to represent the different types of to-dos, for instance ‘Personal’, ‘Team’, ‘Company’.
Creating Buckets
You can start adding Buckets to the plan by pressing the Add Buckets button, which is shown in Board view, once you have created a new blank plan. If you wish to add a bucket to a non-blank plan, click in the Create new bucket box to the right of all existing buckets.
Once you have created a bucket, you can start adding items to that bucket. In Board view, click in the “Create a new item” box, just under the bucket header, type the name of the new item and press Enter. A new item will be created and will be displayed under the bucket header.
The bucket header shows the number of items in the bucket and provides a grab handle letting you drag the bucket header horizontally, so that you can change the order of the buckets.
Deleting a Bucket
When you position the mouse pointer over a bucket header, a dropdown selector is shown at the right of the bucket header. Clicking on the selector will reveal a Delete Bucket menu, which if selected will let you delete the bucket. Note that all items in the bucket will also be deleted.
Grouping Plan Items
By default, plan items are grouped by the bucket they belong to, which means that the Buckets are displayed horizontally across the screen in Board view, or they are displayed in vertical groups in Table view. Workteam lets you additionally group a plan by any of the Category or Person fields that exist in the plan.
The various field that are available to group by may be selected from the Group by menu in the Plan header. For instance, choosing “Status” from the Group by menu will display “Not Started”, “In Progress” and “Complete” headers across the Board view and plan items will be organized into each of these columns accordingly.
Dragging a Plan Item to Another Bucket
You can change the bucket a particular plan item belongs to, simply by dragging it from its current bucket to the new bucket. If the plan is grouped by a field rather than by buckets, you can still drag the plan item from one column to another. Doing so will change the plan item, depending upon how the plan is grouped.
For instance, if a plan is grouped by Status, then dragging a plan item from the “Not Started” column to the “In Progress” column will change the item’s status accordingly. Similarly, if the plan is grouped by a person field, for instance an Assignee field, then dragging the plan item to a different column will change the assignee of that item and, depending upon the field configuration, the newly assigned person will be notified that they have been assigned the plan item.